
It’s the time of the year for fun in the snow! Many people in the Netherlands go on wintersport vacation and though it might be fun, they all have to go through at least one shared horror: maps of ski resorts. Side views, distorted distances, cluttered icon piles and company logos. However, there is a solution: OpenStreetMap!
OpenStreetMap (OSM) is an open geographical database: a map that anyone can edit. The volunteers who contribute to OSM can add details they find important, which includes landmarks important for wintersports: pistes, lifts etc. The only challenge is to visualize these landmarks: how do you go from a database of points and lines to an image shown in a map app?
For this I advise using OsmAnd+: an open source map app on Android/iOS with a ton of features, including:
- Pistes with direction and difficulty
- Lifts (with opening times if registered)
- Height contours
- Routing over the pistes and lifts taking height variation into account
- Track recording with on-map visualization, speed and altitude profiles
- Search for points of interests like bars, supermarkets etc., basically all the other features of a full-fledged map app.
Some of these features are paid only in the App Store/Play Store version of the app, so I recommend installing through F-droid, an open source app repository. Installation this way can be a challenge though, therefore I wrote this little guide.
Note: F-droid is only available for Android devices. On iOS you are limited to the App Store version. It can still display the “Winter and Ski” map style, but you can’t use topography and use that for routing.
Installing OsmAnd+
If you do not have OsmAnd+ installed yet, see this post for instructions
Configuring OsmAnd+
Once having OsmAnd+ installed, we need to download and configure the map to show the wintersports features we are interested in.
- Open OsmAnd. You will be asked if you want to download map files for the region you are currently in. If this is the region you are interested in, then do so. Otherwise “skip download”.
- Go to the side menu in the bottom left -> Plugins and enable:
- “Trip recording”
- “Topography”
- “Ski map view”
GPS track
- To record a GPS track, tap the “REC” button in the top right of the map view.
- If it asks about Battery optimization, press “Battery optimization settings” which brings you to your phone settings. Select the OsmAnd app in the list and disable the battery optimization. If you do not do this, the GPS track most likely will not record properly as soon as you turn off the screen of your device.
Map configuration
- Go to the area that you are interested in on the map and click “download”. This will show up if you are zoomed in enough.
- You can also go to the side menu -> “Maps & Resources” and select the region in the list.
- In this same window you can download the contour lines. Make sure you get them in the units you desire (meters or feet).
- If you want to also have hillshade (giving a shading to the mountains so you can easily see the side slopes), also download the “Terrain map (3D)”.
- Now to enable the ski map view: go to the side menu -> “Configure map” or click the globe icon in the top left
- Scroll all the way down to “Map rendering” -> “Map style” and select “Winter and ski” all the way at the bottom.
- To enable the hillshade (with the “Terrain map (3D)” downloaded earlier), simply scroll to “Topography” in the “Configure map” screen and tick the enable box.
- You can now enjoy a nice wintery view with white slopes, pistes color by difficulty and mountain peaks indicated!
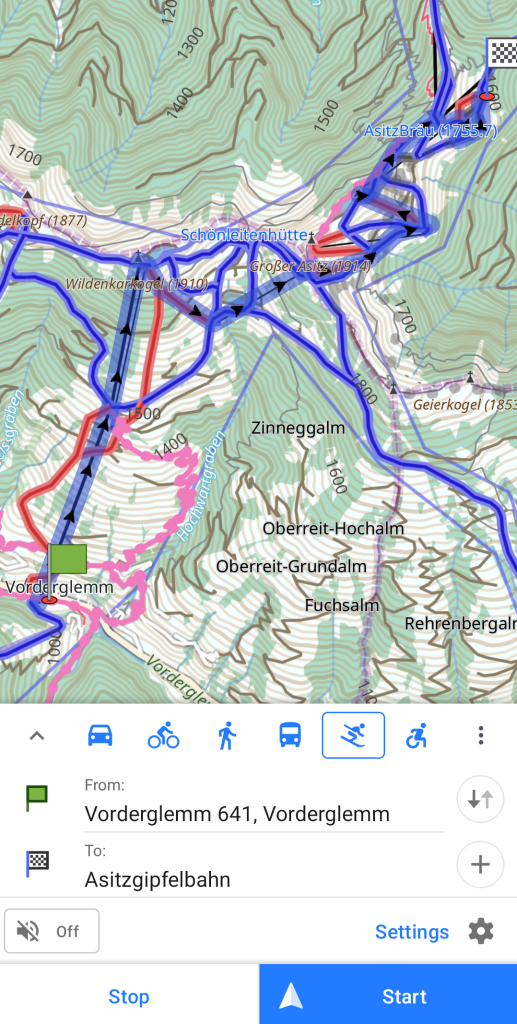
Routing
- To start navigation, use the arrow button in the bottom left of the screen or long press on a location on the map and select “Navigation”
- The navigation screen then shows different modes of routing: by foot, bike, car and also ski/snowboard (if this does not show, enable it in the triple dot menu next to the list). The ski/snowboard option is all the way at the end of the list on the right.
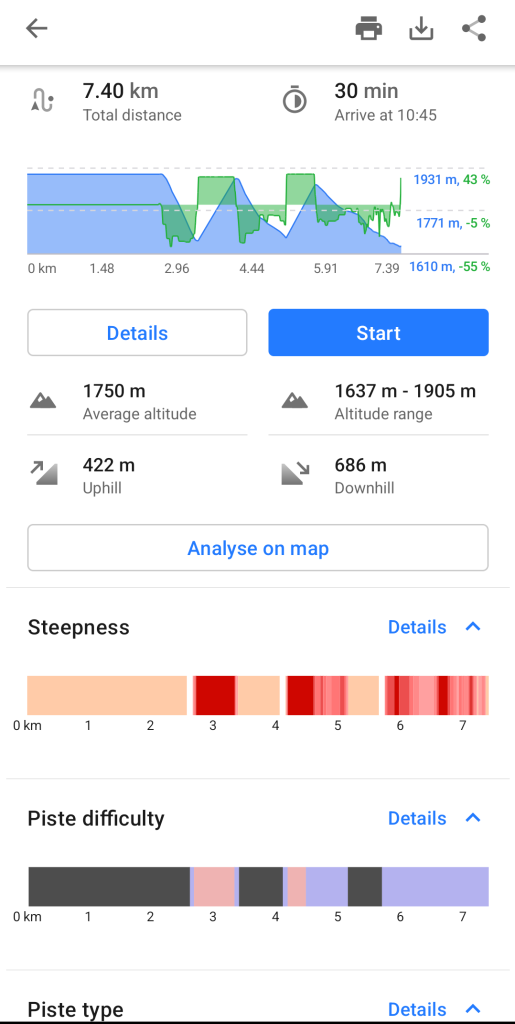
- If you press “Details”, you can see information like piste difficulty and slope. For navigation in e.g. bike mode it shows the road surface type.
Have fun in the mountains!